Wednesday, June 24, 2009
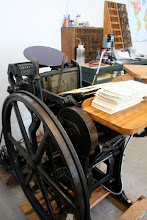
How Letterpress Works
When I first begin working with clients and often when I'm just talking to potential clients about a potential letterpress project, I am often asked "how does letterpress work?" or "how does working with your studio work?". These are fair questions, and ones that I've been meaning to address here (as well as the more formal website for Twin Ravens that I've been working on) for quite some time. I still plan to eventually put this out, in my own words, in the near future, however, I came across this video this morning and thought that it would be a great basis for explaining what it's like to work with a letterpress studio. At Twin Ravens Press, I print from both antique lead type and from photopolymer plates. My studio does a few things different from Starshaped Press, like we always offer several rounds of digital proofs of our designs, prior to printing, etc. All in all, though, I think that their video is a great, short, demonstration of how working with a letterpress studio works. If you are a potential client and are curious about the process of creating your future letterpress printed piece, or if you are just curious, watch this video. It's pretty cute too!
Saturday, June 20, 2009
Olivia & Neer are Getting Married!

I can't believe it's been eleven days since my last post! Things have been really busy this spring/early summer for Twin Ravens Press. The good thing about my lack of posts lately though, is that I will have lots of awesome things to show you in the coming weeks, so stay tuned!
Today, however, I want to show you a very pretty wedding suite that I completed at the end of last month for a couple who are getting married in late August! Olivia and Neer originally contacted me back in February after seeing this suite that I printed for Nataliya and Christopher last year, and this one that I did for a pair of good friends who just got married in May. Olivia and Neer's suite is actually very similar to my good friends' suite, however, we changed up the color scheme and wording to make it unique for Olivia and Neer! Their stationery suite included an A7 size invitation and envelope and a 4bar size reply card with envelope. You can see a picture of all of the pieces in the suite together at the top of this post.
While all of the pieces in this suite are gorgeous, in my opinion, the most stunning piece is the invitation. Olivia and Neer's wedding invitation is an A7 size and was printed on 100% cotton Crane Lettra Pearl White Paper in two ink colors: black and a very light leafy green. I love the way that the florals in this design really interweave and interact with the actual text of the invitation. It's very elegant and beautiful and draws the recipient's attention to the textual information on the invitation very well.


The above photo is a close-up of part of the invitation. Click on the above photo to make it larger - you can actually see the impression and the way that the two colors overlap with each other. All letterpress printing is done one color at a time, one sheet at a time, so when you have multiple colors like this that overlap, you are actually physically making an impression of your second (or third, or fourth...) color over the ones that you have printed previously. I really love this affect and think that it really adds to the unique "look" of letterpress. Very pretty, don't you think?
The invitations were mailed out in a single soft white A7 size European Pointed Flap envelope from Waste Not Paper Company. I printed their return address on the flap in light green, which you can see here:

The other important piece in this suite, is of course, the reply card. Olivia and Neer's reply card was designed using the same colors and floral elements as their invitation and also included a small black border to frame the design and text. It is a 4bar size card, also printed on Crane Lettra. It came with a Leaf Green envelope from Waste Not Paper that nearly matched the green ink color on the invitations. I printed their address on the front of these envelopes in black. Check it out below:


I really love how simple and elegant this whole suite is! Olivia and Neer were fabulous clients to work with and I know that their New York City wedding in August is going to be beautiful!
Congratulations Olivia and Neer!
Tuesday, June 9, 2009
Save the Date: Sarah & Geordie are Getting Married!

A few weeks ago I completed a lovely and unique little set of Save-the-Date cards for a pair of good friends who are getting married in late August of this year. Sarah and Geordie were one of the first couples I met and became good friends with, shortly after moving to Eugene, and I am excited to be designing and printing their wedding stationery! We're currently in the process of working on their main invitation suite, but I thought I would share their Save-the-Date cards in advance!

Sarah & Geordie's Save-the-Dates were an A2 size (4.25"x5.5") and were printed on a custom-made, plantable, seeded paper from Porridge Papers in Nebraska. The paper color is called "Birchy-Dirt" and is a very warm, earthy color. This paper is embedded with mixed wildflower seeds and will actually grow if the Save-the-Date is ever planted. (How cool is that!?!) We used two ink colors - metallic gold and chocolate brown. Here is a close-up so you can get a better look:

Sarah and Geordie's wedding is going to be outdoors at a Christmas Tree Farm, so for the design, they wanted to keep everything really earthy, natural looking and simple. We used a pretty little tree and fence motif at the top of the card and used a pretty and whimsical script font for all of the writing. We added another splash of color to the set by pairing it with a light yellow envelope from Green Paper Company and printing their address, in chocolate brown ink in the same script on the flap.

Sarah and Geordie loved the Save-the-Dates, however, we are mixing things up a bit for the rest of the invitation suite and I'm very excited to see what we come up with! Congratulations Sarah & Geordie, I'm so excited for you!
Friday, June 5, 2009
Fonts + Geeky = Awesome
Happy Friday everyone! For those who need a little bit of semi-work-related humor after a very busy week, like I do, I found this awesome video. It's got fonts, superheroes, personifications and more! What could be better?!?
Thursday, June 4, 2009
Cherie & Larry are Getting Married!

Let me tell you: I have been totally excited to show off this wedding invitation suite, pretty much since the bride, Cherie, originally contacted me about it back in January. The invitations and related pieces were completed for this suite in early May, however, I wanted to wait to show it to you until all of the pieces were completed, including the paper goods for the actual wedding and reception! You can see the majority of the pieces in the photo at the top of this post. Cherie and Larry's suite included the wedding invitation, reply card, reply card envelope an inner/outer invitation envelope set, place cards and program covers - all of which were letterpress printed.
So, what makes this particular suite so much fun you might ask? Cherie & Larry have an awesome theme! Cherie explained that for their small ceremony and reception in late June in Sausalito, California, they were having a vintage theme of "Eat. Drink. Be Married." and their color scheme was going to be yellow, grey, blacks and whites. I thought to myself, "Vintage + Letterpress, what could be better?", plus the "Eat. Drink. Be Married." part - too cute for words.
When I began working on the initial designs for Cherie and Larry's suite I came up with quite a few vintage-looking ideas. Some had ornate, fancy borders, and some used older-fashioned type styles and graphics. The designs that you see above and throughout this post, however, came from a combination of these things and were inspired by my love of vintage letterpress posters. Back in the day, large letterpress posters (called broadsides) were printed to advertise shows and events and were often printed using antique wooden type and featured large borders and fun graphics. If you ever get a chance to do some hunting around for vintage posters either online or at museums or in graphic design books, you really ought to, some of them are absolutely fabulous! When I told her about it, Cherie loved this vintage poster theme idea and pretty much gave me free design reign (which I love) to come up with something awesome. Let me tell you - these are truly awesome.
Like I mentioned previously, you can see the majority of the pieces in the suite at the top of this post. Below you will find a photo of just the invitation and inner/outer invitation envelope set, by themselves:

Traditionally, any formal invitation for an event was mailed in an inner/outer envelope set. Nowadays, many wedding invitations are mailed out with just a single outer envelope. Typically with an inner/outer set, the physical address would be written on the outside of the outer envelope with the return address printed on the back flap (just like with a single envelope) and the guest's names who were being invited would be written on the inner envelope with no address. In order to keep with the "traditional" aspect of their theme, Cherie chose to go with an inner/outer set - but in more modern colors. The outer envelope was a standard white, and the inner envelope was a dark grey. Both envelopes featured a European Pointed Flap, were sized for an A7 invitation, and were purchased from Waste Not Paper Company.
The main piece inside those envelopes was their wonderful invitation!

Cherie and Larry's invitation is a standard A7 size and the design for it was inspired by vintage letterpress posters. It was printed in three ink colors: light lemon yellow, darker mustard yellow and dark grey. I love the way that we were able to incorporate a vintage look and vintage design elements into a set of pieces with a more modern set of colors and theme. For example, a lot of traditional posters featured some kind of fancy ribbon or banner at the top of the poster - I created a banner for the top of this design that was printed in grey ink and had their phrase "Eat. Drink. Be Married!" written in a script font across the top. Just below the banner, are Cherie and Larry's actual silhouettes. Cherie had these done in California, where she lives, and sent them to me to use in the design. Silhouettes seem to be really popular for invitations this season and I think using them in this design was an awesome idea. Check out this close-up:

Aren't the colors just wonderful together too?!? I love them! Since the couple themselves are the "main attraction" at their wedding, I wanted Cherie and Larry's names to be the most prominent text element on the invitation. In order to do this, Cherie and I picked out a pretty and unique font, printed it in yellow and gave it a dark grey drop shadow effect.

I used an old-fashioned "and" graphic from a vintage poster design for the "and" between their names. Keep in mind with letterpress, that each color is printed separately, one sheet at a time. Because that drop shadow is so close to the thin yellow lines of the letters in their names, the grey ink layer was a real challenge to register (line up with the other colors) and then print. It took me several tries to get it right, but once I did, the affect was truly amazing.

Another thing that I love about this suite, that's not really possible with all designs, is the number of different fonts we could use, and in a sense "get away with" using, without making the design look cluttered. When I was in design classes in college I can remember professors saying that generally, it's best to only use 1-3 fonts, and not more, within a design. This keeps your design looking clean, and uncluttered. Generally speaking, I agree with this piece of advice, however, all of the vintage poster designs I have seen generally use LOTS of different fonts. I think back then, it wasn't so much a design consideration, as something they did because of what they had lying around (historical typesetters were limited to using only the wooden and metal typefaces they had on hand). But nevertheless, for a design like this, I LOVE the look of a lot of different fonts, harmonizing with each other to make up a complete design. (Yes, I know, I am a total design/typography nerd - sometimes there's no hiding it...).
For the reply card, I tried to stick with the same vintage poster theme, while having all of the functionality of a regular reply card. Most of the reply cards I design are a standard 4bar size, however, in order to accommodate all of the lovely design-element-awesomeness, I designed Cherie's to be one size bigger. It's an A2, which measures 4.25"x5.5". Like the invitation and other pieces in the suite, this card was printed in three ink colors on Crane Lettra Pearl White 100% cotton paper. The reply card envelopes were the same dark grey color from Waste Not Paper Company that matched their inner invitation envelope and the couples' address was printed on the front of them in black ink.


I tried to incorporate all of the fonts/design elements from the main invitation into the slightly simpler reply card. In keeping with the silhouette theme, we used silhouette-symbols of different "meal options" for their menu choices. I love using the little symbols for this and think that it adds a really cute element to any reply card. Here is a close-up of the reply card so you can see the fonts and impression a little better:

The other two pieces I created for Cherie and Larry are for their actual wedding ceremony and reception. The first of these was a set of small place cards. These place cards are tented, and when folded are the same size as a standard business card (3.5"x2"). Once again I tried to use all three colors and design elements from the other pieces to keep everything coordinated. They also turned out great!

Last, but certainly not least, was a set of program covers. These covers were somewhat of a challenge to print because of their larger size and because they have a lot of ink coverage, but they turned out fabulous! They were designed to be just slightly larger than a regular 8.5"x11" sheet of computer paper, folded in half the long way, so that Cherie could create the inside contents of her program herself and insert it into the covers later. Here is what the program looks like opened up, so you can see both the back and front at the same time:

All of the design elements and fun little graphics I used for the invitation are still there in this design, just rearranged into a more program-like format. Here is what the front of the program looks like, when folded:

And here is one more close-up so you can get an even better look at the awesome-ness:

Very cool, don't you think? So far, this is easily one of my favorite new designs this year and I love the fact that Cherie and Larry really let me take their theme and run with it! They were fabulous clients to work with and I would gladly do design and/or printing work for them again. In a recent e-mail Cherie even told me that some of her guests liked the stationery so much that they didn't want to return the reply card - and some of them just flat-out didn't, and called or e-mailed with their response instead. I know that they are going to have a wonderful celebration in a couple of weeks!
Congratulations Cherie & Larry and all the best!
June Meet Your Maker & First Friday Artwalk Tomorrow!

If you're in the Eugene/Springfield, Oregon area tomorrow and are looking for something fun to do on Friday night, you should come downtown for the First Friday Artwalk! All of our local galleries will be open and food and beverages will be served! While you are looking at all of the awesome art, you should also swing by The Broadway Wine Bar on the corner of Broadway and Charnelton Streets. The Broadway is hosting a wine tasting as well as the one year anniversary of the Meet Your Maker Indie Arts and Crafts Show and Sale tomorrow evening from 5:00 to 8:00 pm. Both the admission to the show and wine tasting are free! You can see the poster for the show at the top of this post. Twin Ravens Press will have a booth there and you can also shop with other fabulous local/Oregon artists and small businesses including: La Petite Vie, Loop'd, Bellybaloo, Firefly Jewelry Design, Practical Rabbit and several others! Come down, see some cool art, drink some wine and check it out!
Wednesday, June 3, 2009
Eleanor & Jeremy are Getting Married!

Last month I completed a really sweet and summery little wedding invitation suite for an American couple that is living in Tunisia (they work for the State Department), who are getting married in Massachusetts later this month! How does a couple living in a country that far away find out about Twin Ravens Press, you ask? She was recommended to us by a previous client, Isabel, who just moved to Tunisia for work as well. If you'd like to read about Isabel's stationery (which also turned out really cool!), you can here, here, and here.
We went through several different ideas in order to get to the lovely set you see at the top of this post. When Eleanor and I originally started talking about designs she thought that she probably wanted a design with a barn (they are getting married at a family farm), or a barn door. We came up with quite a few lovely mock-ups of what this design could potentially be, and while I think any of those would have turned out beautifully as well, I think it's pretty neat that ultimately she ended up choosing to go with this simple, yet beautiful, summery hydrangea design. Eleanor and Jeremy's suite included the invitation, a reply card, an invitation envelope and a reply card envelope.
As I mentioned before, you can see a photo of all four pieces in Eleanor & Jeremy's suite together at the top of this post. Below is a photo of just the invitation, by itself.

Eleanor and Jeremy's invitation is an A7 size and was printed on 100% cotton Crane Lettra Paper in their Ecru color. I really like the Ecru paper from Crane - it's very warm and inviting, and in my opinion, very different from a regular white paper without really being a strong "other color". As you can see in the photo, I drew two blue hydrangeas for the design on the left side of the invite and then the text was arranged around them. For the fonts we chose a very nice, handwriting-like script font for their names and then a very nice classic serif font for the rest of the text. I really love the texture that both the fonts and all of the small line work in the hydrangeas created for this design. Here is a close-up photo of part of the invite so you can get a better look at the fonts, ink colors, fine hydrangea details, and the impression:

Very pretty, don't you think? Here is the A7 size envelope that accompanied the invitation:

This envelope is a light blue from Waste Not Paper Company and it features a European pointed flap. I printed Eleanor's parent's address on the flap in the same green ink that I used for the invitation. I matched the blue ink for their names and the hydrangeas on the invitation, to the blue of this envelope! It turned out really really nice.
For their reply card, Eleanor and Jeremy chose a standard 4bar size and we used basically the same design elements for it as we did for the main invitation. We also decided to go with the same light blue color for the reply card envelope that we used for the main invitation envelope and printed the bride's parent's address on the front in green ink. Here is a photo of the reply card and envelope together:

Here is a closer photo of just the reply card, by itself:

If you are working on designing a response card for your upcoming wedding or other event and you have multiple events that your guests could attend, I highly recommend having some sort of way for your guest's to tell you which event(s) they plan to attend, rather than just giving them the option to accept or decline. Eleanor and Jeremy are planning to have a barbeque the night before the wedding and reception, so they made an option on their card so that guest's could indicate whether or not they would attend the barbeque as well as the wedding and reception, or just the wedding. I think this is a great idea and helps to keep everyone more organized prior to the event.
Eleanor and Jeremy were really great to work with and I wish them all the best for their upcoming celebration and in the years ahead! Congratulations Eleanor & Jeremy!
Monday, June 1, 2009
Paul & Jesika's Wedding

This past weekend I made the short drive up I-5 to Salem, Oregon for a couple of my friends from college's wedding. If you've been following this blog for a little while, you may remember me mentioning Paul and Jesika. I designed and letterpress printed their wedding stationery, which you can read about here.


The wedding was at Zenith Vineyards, a very pretty, little winery, just outside of Salem. The wedding wasn't over-the-top fancy, but it was beautiful, the weather was gorgeous, the food was fantastic and it was really fun to get to see and visit with not only the bride and groom, but other college friends that I hadn't seen in a few years.
I must admit that I didn't really think much about weddings until I started Twin Ravens Press, but since I started my business the subject of weddings - what they are, what they mean to the people having and attending them, different ways and styles of having them, how to design paper goods with all of that and more in mind, etc... is something that fills both my work and non-work-related thoughts on a much more regular basis. It's really fun though, these days especially, when I actually get to attend a wedding of both people I know and people that I got to design and print for. Something about it makes what I do for work, in a lot of ways, seem much more important and special - not just for me as the designer, but also for all of the people that the designs were for. One of the guest's whom I hadn't met prior to the wedding even said that the invitations were the most beautiful she had ever seen - pretty nice compliment if you ask me.
Anyway, here are some more pictures of the event. I don't know that my recapping the whole afternoon and evening would add anything to this, but all I can say is that the bride and groom looked so happy, both families were really sweet, proud and supportive and the whole event was a really good time. Take a look for yourself:


Paul & Jes - if you end up reading this, I just want to say "Congratulations!" once again. It's been really wonderful getting to spend the last several years knowing you, going to college with you, finishing college with you, and moving on into our careers and post-college lives and relationships. You guys have always been great friends and a great couple and it was really exciting to see you make a life-long commitment on Saturday. Thank you for inviting us to share in your special day!
Subscribe to:
Posts (Atom)